Month: December 2022

Morning Skincare Routine

We have a lot of people inquiring about our skincare routine and complimenting on our skin (thank you) so I thought it be easier to have everything I use in one post. 

I use to have 1000 products in my routine thinking it will guarantee good skin but once I paid attention to the quality of ingredients I eliminated all of the unnecessary steps. I also was applying things in the wrong order…oops but hey, my failures are learning lessons for your success.

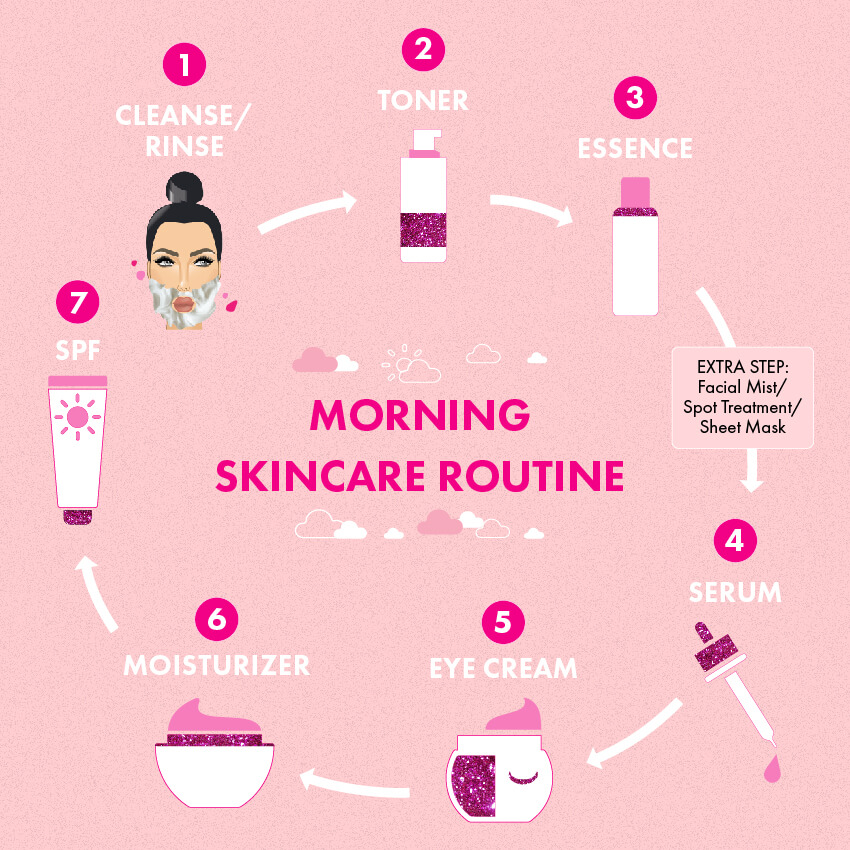
Here is a nice diagram I found online on the basic steps on how to layer your products and what you need.

I try to be consistent with both AM/PM routines but ya know my laziness gets the best of me sometimes. If I happen to fall asleep in my makeup (huge NO-NO) I would add double cleansing in the morning.

If I followed my own directions the night before then this is my daily AM skincare routine: 

1. Cleanse/Rinse: I have dry skin so I do not use a cleanser in the morning. I wish I knew this tip sooner because I was essentially drying out my skin more by cleansing in AM/PM. Now, I gently rinse with warm water and pat dry.

2. Toner: I like to be efficient and having multi use products. Discovering  Laneige Cream Skin toner was a dream come true. I apply the toner on a cotton pad and wipe my face down. This feels amazing on the skin and doesn’t feel like I’m stripping my skin. 

3. Essence: After using Laneige Cream Skin toner , I honestly didn’t feel the need for using an essence which saves another step and money! But if you wanted to add one, I enjoyed FRESH Kombucha Antioxidant Facial Treatment Essence

4. Serums: Vitamin C is a must have ingredient in any serum you use. It helps with uneven skin tone, rough texture, fine lines, scars, and just gives you a GLOWWWW. I’m on my second bottle of La Roche-Posay Vitamin C Face Serum 

5. Eye Cream: This step is also unnecessary if you use a good moisturizer but because my skin is dryer than the desert I like applying eye cream during the day. I gently pat in Kiehl’s Avocado Eye treatment under my eyes, on my eyelids, and on my laugh lines. You just need a tiny amount and applying this gives my Vitamin C serum time to soak in.

6. Moisturizer: My moisturizer graveyard is ridiculous and shameful. I have purchased and tried out so many before I found my go-to ride or dies. I want something that gives me a hydrating glow, but not too glow-y that I look sweaty. Something that is richer in texture but doesn’t feel heavy on the skin. Thank you psoriasis for making me become a picky bish lol. My ride or dies for the past 2 years: Tatcha The Dewy Skin Cream and La Mer Moisturizing Soft Cream 

7. SPF!!!!!!!! If I could only choose one morning skincare product it would be SPF. Without using SPF the rest of the products are pointless. You need SPF even if you’re driving to the store quick. Get into the habit of applying SPF in the morning like how you brush your teeth. SPF is essential to protect your skin, prevent wrinkles, sun damage, etc. We are spending all of this time and money on skincare products but if you don’t wear SPF you are just wasting your efforts. 

I had a hard time finding SPF products that wouldn’t irritate my psoriasis on my face, even the “sensitive” ones would sting my skin.  It has also been hard finding a sunscreen that didn’t effect my makeup foundation color. Currently, i’m on my third bottle of Krave Beauty- The Beet Shield and never looked back. I love how it moisturizes the skin, truly is undetectable, and DOESN’T STING. I apply a generous amount to my face and use what I have leftover in my palm to rub in my neck, chest and hands.  For my no makeup days I also love Glowscreen Sunscreen to protect my skin and give me that fresh faced look . 

8. Bonus: Once a week I shave my face (weird, I know) and exfoliate my face and body. I use this Women’s Disposable Razor to shave my hairy face. This helps brighten up my complexion and remove texture to keep my makeup looking smooth. I use to wax but it was ummmmm painful. Shaving is painless, cost effective and way easier. 

Then I exfoliate my body with Smoothie Star Breakfast Scrub and use ExfoliKate for my face. 


Amazon Activewear Haul

Okay, y’all know i’m trying to be better on accepting my body at all phases along this wellness journey. I’ve been holding off buying new leggings for so long that my current collection was literally holding on by a thread. 

I found myself searching on Amazon for some new activewear and came across a bunch of listings for an affordable price! 

Here’s my review on what I purchased. For reference I usually wear a size 12 for pants and I’m 5’6.5…(yes that .5 counts LOL)


Long sleeve crop top: I freaking love the fabric of this top! It’s surprisingly very cooling and you can wear it in two ways. I ordered it in a size large and felt it was true to size. 

These leggings felt like butterrrrr on the skin and was easy to slide on and off. You get two leggings for the price of one! Crazy deal with a lot of color combos. I got mine in the grey and pink and it looked smooth on places my cellulite would typically show. I ordered this in a size large and it fit my hips and thighs perfectly but I had to keep pulling it up around the waist area. I usually have this issue with high waisted bottoms because of my measurements but it wasn’t annoying and I will continue to wear them. 

These are a must have for a basic black legging. I love the designs of the seams and it is not see through! Winning! The fabric also felt very breathable and was true to size for my usual “large”. 

Okay, these took a second…or two…to put on but out of all of the leggings this had the best tummy control and stayed fitted on my waist. I got this in purple and it has a cute mesh design on the calves.

Guide to Hot Pot & KBBQ Grill’n

If you watch our instagram stories you know we love eating hot pot/bbq and YESSS, it can be keto. Most of the time Hot Pot & KBBQ would be cooked using two separate appliances but now with this awesome 2-in-1 gadget, we can have the best of both worlds in one sitting.

Since we get so many messages when we post about it in Instagram stories we figured a blog post was NECESSARY lol so here’s an overview with some tips n tricks. 


What is it? 

Both hot pot and kbbq grill is a dining experience that you can have with your friends and family in the comfort of your own home. You cook thinly sliced meats, vegetables, and low carb noodles via broth or griddle. Once it’s cooked to your liking, you can dip it in your sauce of choice and enjoy till you are stuffed and can’t breathe. Just kidding…or am I? 

Your spread can be as extreme or simple as you want. The beauty of this way of eating is that you literally have endless options that can fit your keto/low carb needs and the carbies in your life without having to adjust too much or making a separate meal.

Low carb Hot Pot

Protein: Thinly sliced beef brisket, pork belly, and ribeye is my fav. Along with beef (pho) meatballs and fish meatballs. Most of these items can be found in an Asian Market. Since we moved to Cali we enjoy going to Hmart to find these goodies. Hmart has a large variety of meat fresh/frozen and basically all the essentials you need. 

Vegetables: Watercress, spinach, straw mushrooms, enoki mushrooms, and seafood mushrooms are delicious and fulfilling. 

Noodles: If I want to throw noodles in the mix, I use “Healthy Noodles” from Costco. Find the scoop on these noodles here > Healthy Noodles

The carbies in my life enjoy vermicelli or rice noodles.

Dipping Sauce: This is definitely a personal preference. Spicy, sweet, salty, sour…it’s all up to you! My fav is spicy…of course. I start off with 1 tbsp soy sauce, 1 tbsp red wine vinegar, garlic, heaping scoop of hot oil, fresh Thai chili peppers, and cilantro. Try this brand if you want a clean version of soy sauce.

Hot Pot Broth: 

We prefer using pre-made bases because it’s simple and quick. Most of the pre-made bases are a bit dirtyyyy keto but we are okay with it. If you prefer, make any of your favorite flavored broth as your base to dip. Thai Tom Yum, pork, or beef broth are some other popular bases. Here’s the pre made base we like. 

Low Carb KBBQ

Protein: Similar to hot pot, thinly sliced beef brisket, pork belly, and ribeye won’t do you wrong. Usually I stick with the non marinated meat at home and kbbq restaurants since I enjoy the flavor in the sauce and the taste of the grill. But if you like marinated meat check out  our recipe. >> Keto-Friendly Beet Bulgogi

Vegetables: I prefer having the veggies in the hot pot broth vs kbbq but the fam likes grilled white onions, mushrooms, jalapeños, kimchi, and salad. Here’s our recipe for a Keto Korean BBQ inspired salad. 

I do like to use thinly sliced pickled radish to wrap the meat in though with fresh jalapeños. Pickled radish wraps are a not a substitute for rice paper but it’s a great alternative to wrap your meat in. >> Pickled Radish Wraps

Noodles: I would do the same as hot pot and use healthy noodles. 

Dipping Sauce: For the kbbq grill I like to do sesame oil with a dash of salt or the same concoction as hot pot. 

Griddle: The griddle is non-stick but adding butter to cook the non marinated meats is bombbb.

What you need:

Gadget: This is non stick and super easy to clean. After use I unplug the cord and drain all the grease to dispose of properly then rinse and scrub with a sponge just like a pan. Then I just dry with a paper towel and leave it on the table for the next round or store in the cabinet. 

Tongs: Use tongs or chopsticks to pick up the delicious meats and stay a safe distance from the griddle lol 

Strainer: Not necessary but great to have for hotpot so you can retrieve your meats and veggies easier if you don’t want additional broth.


Keto Ice Cream Base

Y’all, I recently purchased this Pint Ice Cream Maker and I’m in love. It’s the perfect portion for David and I to share some ice cream when we get cravings and I love the texture – it’s like a soft serve and it’s sooooo good. We used to have a huge cuisinart ice cream maker but this one is just the right size.

Here’s a recipe for a super simple ice cream base. You can be creative and add all types of extracts and colors to the mix. Whatever your liquid tastes like is what your ice cream will taste like – so make it your own!

Keto Vanilla Ice Cream

So simple but delicious.

Prep Time: 2 minutes
Cook Time: 20 minutes
Chill time: 25 minutes
Course: Dessert
Cuisine: American
Servings: 2 people
Net Carbs: 5g

Equipment

Pint Ice Cream Maker

Ingredients

  • 2/3 cup heavy cream
  • 1/3 cup milk of choice (we used whole milk but you could use half and half, oat milk, almond milk, coconut milk, etc)
  • 1.5 tbsp Powdered swerve (more to taste)
  • 1/2 tsp vanilla extract
  • pink salt (just a dash)

Instructions

  • Mix all of the ingredients together to form a liquid base. Mix until the liquid is smooth.
  • Place the liquid base into the freezer for about 20 minutes.
  • Slowly pour the liquid base into the frozen base of the ice cream maker.
  • Turn the motor paddle on and slowly lower it on top of the frozen base.
  • Let the ice cream churn for about 20 minutes.
  • Enjoy!

Nutrition

Calories: 302kcal | Carbohydrates: 5g | Protein: 3g | Fat: 31g | Sodium: 48mg | Sugar: 2g | Net Carbs: 5g

We only share products/services that we love. This post contains affiliate links, which means we may receive a commission for purchases made through our links.

Tried this recipe?Please leave a review below and tag us @TheKetodashians on IG!


Super Easy Roasted Broccoli

This is one of our favorite ways to prep broccoli and it can be done in a flash. It pairs perfectly with any protein and can be eaten hot or cold.

@theketodashians

##fyp ##foryourpage ##tiktokfoodie ##tiktokrecipes ##foru ##keto ##ketotips ##ketoaf

♬ Summer Feelings (feat. Charlie Puth) – Lennon Stella

Roasted Broccoli

The perfect side to any dish.
Prep Time: 2 minutes
Cook Time: 10 minutes
Total Time: 12 minutes
Course: Appetizer, Side Dish
Cuisine: American
Servings: 4
Net Carbs: 3g

Ingredients

  • 2 tbsp olive oil (or more to eat the broccoli)
  • 4 cups broccoli florets (bite sized pieces)
  • 1 tbsp #basicbae (to taste) – use salt/pepper if you don't have it.
  • 1 tsp garlic powder (to taste)

Instructions

  • Pre-heat the oven to 400 degrees.
  • Line a baking tray (or air fryer rack) with tin foil.
  • Coat the broccoli pieces with olive oil, #basicbae seasoning, and garlic powder.
  • Pop the seasoned broccoli into the oven and bake it for 10 minutes or until the broccoli is crispy.

Nutrition

Calories: 95kcal | Carbohydrates: 5g | Protein: 3g | Fat: 7g | Sodium: 31mg | Fiber: 2g | Sugar: 2g | Net Carbs: 3g

We only share products/services that we love. This post contains affiliate links, which means we may receive a commission for purchases made through our links.

Tried this recipe?Please leave a review below and tag us @TheKetodashians on IG!